|
|
|
LESSON 2 . USING STITCH REGULATOR MODE - HIGH SPEED REGULATED.This lesson concentrates on using high speed regulated mode. The instructions are less detailed than in lesson 1 as it is assumed that you know how and when to tie off your threads and, of course, when and how to arm and disarm your machine. You should advance your practice piece as necessary. Please repeat the individual sewing exercises if you feel you need more practice at any stage. Thread your machine with one that you know works well in your machine. This is not the time to try out new threads. The thread should be a contrasting color to the practice piece, which should be already mounted. Do not clamp the sides at this point. Work at the front (needle side) of your machine. Set your dial to B2 - what size stitch will this be? Starting at the left front edge of your practice piece, you are going to baste up the left side, across the top and down the right side as far as you can without advancing the quilt. Begin by securing your thread ends using the single stitch. Now clamp the sides. Arm the machine - remember to watch for the run light, then release the button. If you hear a beep, you've held the button down too long so disarm the machine and start again. Remember this every time you arm the machine in this lesson. Remember also that you do not need to start moving the machine as soon as you press the start/stop button. Sew up the left hand side of your practice piece. When you get to the top, pause then go across the top. Pause again when you reach the right hand side before coming down the right side as far as you can. Don't move your machine very fast. Tie off your threads. Now start again at the top left of your practice piece. Set the dial to 6 SPI. Secure the thread ends and sew a wavy or undulating line across the full width of your quilt sandwich. Move the machine at a moderate speed - you do not want to hear any beeps or see the fail light flash. (What does this mean?) When you reach the right hand side, make a u-turn and echo the first line of quilting about half an inch away back to the left side. Pause here and change your dial to 8 SPI. Echo again across to the right side and back to the left. Pause once more and change the dial to 10 SPI then continue to echo across and back. Pause again to change the dial to 12 SPI and continue sewing as before. Finally pause and change the dial to S and echo again across and back. You have now sewn with all the different sizes of regulated stitches. Are all your stitches even or do you have some longer stitches where you started off after a pause? If you see long stitches at that point, you were moving off too fast. When you start out, you need to accelerate slowly. This is quite different to the way you used to move your machine. Before the I/S, you had to start moving the machine quickly as soon as you pressed the start/stop button to avoid getting lots of tiny stitches. Now with the I/S, if you move quickly, you will get long stitches because you are moving too fast for the regulator to keep up. The next exercise helps you practice this slow start. Start with 6 SPI again. Begin at the left hand side of your piece. This time sew in a straight line for about 6 inches then pause. Continue sewing for another 6 inches and pause again. Continue sewing and pausing all the way across and back again to the left side. Now repeat the exercise using all the stitch lengths. How did you do? If you find that you are still getting a long stitch as you start, try using one hand to gently guide the machine. Use one hand and then the other. Since you do not need to keep your finger hovering over the start/stop button ready to press it quickly when you want to stop, you can position your hands anywhere that is comfortable. Next do a medium sized meander over the rest of the exposed quilting area. Pause now and again, and change the stitch length occasionally too. Vary the speed with which you move the machine. If the fail light flashes, you are moving too fast so slow down. When you've filled the space, tie off your threads and advance your practice piece. Baste down each side using either B1 or B2, then clamp the sides. From now on, advance your practice piece as necessary, basting the sides as you go. Set your dial to the stitch length you prefer. Now you are going to sew some designs with sharp changes in direction moving the machine at a speed high enough to activate the coasting feature which will help you pass through these changes in direction easily. If you feel as if the machine is hesitating at a sharp change and you get a long stitch, you are not moving the machine fast enough. Sew a row of clamshells like this , they should be about three inches across and nicely rounded.
As you come to a point , do not slow down or pause - keep moving the machine at a steady and fairly fast speed but do not go too fast. If you hesitate or slow down at the point, the machine may think you are pausing and if you pull out quickly, you will get a long stitch or two. Sew several rows of clamshells until you feel that you are moving consistently and evenly through the points. If you cannot sew through the points smoothly, give the machine a little extra push into the point. Don't hesitate at the change in direction. Now try some up-side-down clamshells. If you are comfortable quilting feathers, try some next. Sew a couple of rows as you would for a border. Again,if you are having trouble sewing through the change in direction, give the machine a slight extra push just before the change and keep moving. The coasting feature, or high speed regulated mode, is only activated when you move the machine quite fast and do not hesitate. (see page 7 of the user guide) Continue quilting feathers until you feel happy with them. After a time you will begin to feel the coasting taking over at the points. Now you are going to sew some rows of leaves like this. Trace the design first with your finger if you are unfamiliar with this type of leaf vine. There are some spaces to make the design clearer - when you sew it, you do not need to leave the gaps. Remember to move the machine smoothly through the changes in direction much as you would when quilting before you got the I/S.
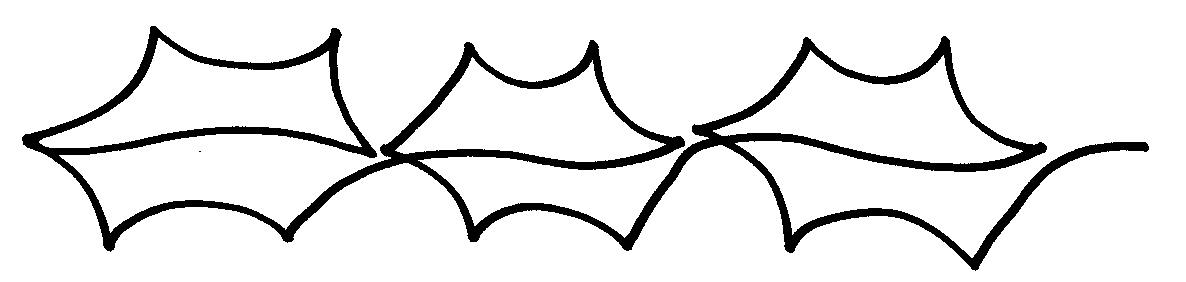
The ultimate test of using the high speed regulation is to sew a holly leaf vine which has lots of changes in direction. If you can sew this smoothly with no hesitation or long stitches the first time you try, you earn a gold star! This usually takes a lot of practice.
Something easy to finish with at the front of the machine. Set the dial to 6 SPI and sew a small meander - make the sewing lines about half an inch apart. Pause and change to 8 SPI then continue meandering. Change to 10 SPI and then 12 SPI in the same way and finally to S. Look at your quilting - which meandering looks best? Notice how the shorter stitch lengths give smoother curves. Try some even smaller stippling and compare how the stitch size affects the look of the quilting. If you sew pantographs, go to the back of your machine and choose one to practice sewing using high speed regulation. Choose a pattern with some sharp changes in direction. You will use the control panel at the back now so remember to glance at it to make sure the dial is set where you want it to be and watch for the run light to come on when you arm the machine. You will also be using your laser light. Do you need to change the size of the dot or its brightness? Do you remember how to do that? As you sew the pantograph, pause and change the stitch length now and then to compare how the different lengths affect the look of your quilted pattern. Decide which you prefer. A Summary of the Main Points in Lesson 2.When starting out, move the machine slowly, gradually accelerating. If you move off quickly, you will get a long stitch. Use high speed regulated mode for quilting designs which have sharp changes in direction that will be sewn quickly. Move the machine smoothly and quickly in order to activate the coasting which will help you move through sharp changes in direction without getting long stitches. Do not slow down or hesitate at points and corners. Use high speed regulated mode any time you want to quilt quite fast. If the fail light flashes and the beep sounds, you are moving too fast and your stitches have become twice the length selected. Slow down.
|


| © 2024 IntelliStitch :: Web Design, Web Development and Hosting by Desiant, LLC |